Notions to Know: How to Sew a Zipper

Zippers are pretty much ubiquitous in our everyday lives – from clothing to accessories to home goods, we’ve all encountered a zipper at some point. But many people I’ve met who sew as a hobby and are great with many different sewing notions struggle with figuring out how to sew a zipper!

There are a few different techniques for attaching different kinds of zippers. but today we’re going to look at the most common and basic way to sew a zipper. It’s going to involve basting, covered in this post, and topstitching, mentioned in this post. You should also dig up your zipper foot if you’re sewing by machine. A zipper foot looks like this:


A zipper foot is essential in learning how to sew a zipper, a sewing notion - Sew Me Your Stuff

To demonstrate how to sew a zipper, I’ll mimic a zip-open back of a dress. Here are the materials I’ll be using:

  • Fabric of choice, cut into 2 equal rectangles
  • Zipper of desired length (Note: if you’re unsure about the length you need, it’s safer to buy a zipper that’s too long so that you can trim it later!)
  • Thread
  • Zipper foot

It's important to learn how to sew a zipper, a sewing notion - Sew Me Your Stuff

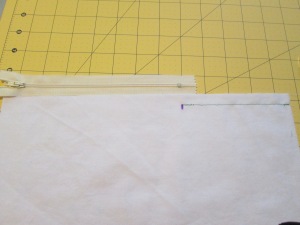
When you sew the back of a dress, before you attach the zipper you’re going to stitch the seam below where the zipper will be. Notice in this picture how I line up the zipper with the edge of my fabric to see where the bottom stop will be and then mark it.

It's important to learn how to sew a zipper, a sewing notion - Sew Me Your Stuff

Since my zipper is going to be 7 inches, I’m going to start the stitch 7 inches from the “top” of the fabric (minus the seam allowance) and stitch all the way to the “bottom.” Use your regular presser foot for this.

It's important to learn how to sew a zipper, a sewing notion - Sew Me Your Stuff

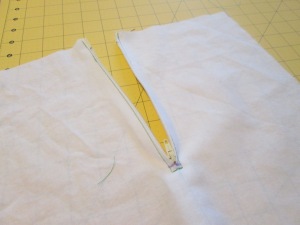
Next, press the seam open, including the unstitched seam allowances. (Review this post if you need to see how to press a seam!)

It's important to learn how to sew a zipper, a sewing notion - Sew Me Your Stuff

Now grab your zipper. Press the zipper tape flat, being careful not to touch the metal coils with the hot iron! Close the zipper and flip the pull tab upwards.

It's important to learn how to sew a zipper, a sewing notion - Sew Me Your Stuff

Position the zipper face down on the wrong side of the fabric, with the zipper teeth centered on the seam and the bottom stop where the stitched seam ends.

It's important to learn how to sew a zipper, a sewing notion - Sew Me Your Stuff

Baste one side of the zipper to the seam allowance, and place a pin right below the bottom stop.

It's important to learn how to sew a zipper, a sewing notion - Sew Me Your Stuff

Flip your fabric right side up, and position your zipper foot so that the foot is to the right of the needle. Set up your sewing machine to begin stitching at the pin, but remove the pin before you stitch.

It's important to learn how to sew a zipper, a sewing notion - Sew Me Your Stuff

Starting at the seam below the zipper, stitch across and up the length of the zipper on the right-hand side through all layers. I recommend starting the stitch with the zipper closed then opening the zipper once you’ve gotten about halfway down the zipper. You can’t sew around the zipper pull very easily, so you’ll want it out of the way.

It's important to learn how to sew a zipper, a sewing notion - Sew Me Your StuffIt's important to learn how to sew a zipper, a sewing notion - Sew Me Your Stuff

Now repeat on the left-hand side, moving your zipper foot so that it’s to the left of the needle.

It's important to learn how to sew a zipper, a sewing notion - Sew Me Your Stuff

Now just remove the basting. Congratulations – you now know how to sew a zipper!

It's important to learn how to sew a zipper, a sewing notion - Sew Me Your Stuff

This is just one method of attaching a zipper, but it’s the basic technique that can be adapted to many different situations.

Happy sewing!


Learni.st
 – Learn how to sew starting from step one
Pinterest & Twitter – Follow for tips, ideas, and more
Etsy – Shop Sew Me Your Stuff

Choosing the Right Interfacing for Your Project

When I first started to learn to sew with interfacing, I just looked for “fusible” and grabbed the first one I saw, thinking they were all basically the same aside form fusible/non-fusible differences. However, there are several (and I mean several) different types of interfacing for different projects and fabrics.

Now that you’ve learned how to attach fusible and non-fusible interfacing, how exactly do you choose the interfacing you need?

Choosing Interfacing Based on Fusibility:

So you know the basic differences between fusible interfacing and non-fusible interfacing, but you want to know when to use one over the other. As a general rule, fusible is better for beginners. Non-fusible (sew-in) interfacing can add bulk to a project that may be difficult for a beginner to handle. Attaching fusible interfacing is also a great way to practice your pressing! It uses less thread and is ( at least I think) a little less time-consuming.

However, sew-in interfacing looks more natural than fusible. Also, if your fabric cannot be pressed you obviously cannot attach a fusible interfacing to it. Here is a handy guide to fabrics that you generally should not hit with an iron or fusible interfacing.

Choosing Interfacing Based on Composition:

There are three basic classifications of interfacing based on composition: woven, non-woven, and knit. The differences are pretty easy to remember!

Knit interfacing is generally used for very stretchy knit fabrics, like jersey, because the interfacing can stretch with the fabric. Using a woven interfacing on a very stretchy fabric will inhibit its movement.

Woven interfacing should be used on very fine fabrics like silk. Woven interfacing has a grainline just like a woven fabric, so you have to cut the interfacing to match the grainline of your fabric, which helps the garment or craft stay true to its shape but can be a little challenging and takes up more of your material. Don’t use woven unless you absolutely need it!

Non-woven interfacing is a nice all-purpose interfacing for most projects, unless you’re using a very fine or very stretchy fabric. It does not have a grainline, so you can cut it in any direction, which makes it a more economical choice. As a beginner, this is what you should choose pretty much every time you have to buy interfacing.

Choosing Interfacing Based on Weight:

Finally, you have to consider the weight of your fabric and how it will be used when choosing interfacing. Aside from some specialty types of interfacing, interfacing is basically classified into a few groups based on weight:

  • Featherweight interfacing – Also called “sheer.” Use featherweight interfacing for very, very light fabrics.
  • Lightweight interfacing – The go-to for most garments.
  • Medium-weight interfacing – I would recommend medium-weight interfacing for crafts that you need to hold some shape but don’t want to be too stiff, like tote bags.
  • Heavyweight interfacing – This is best for most home decor, and when you need a project to hold a rigid shape.

In general, you should simply match the weight of your interfacing to the weight of your fabric. I’ve also heard that when in doubt between two types of interfacing, go with the lighter weight to play it safe. An interfacing that’s too heavy for your fabric will give it a strange appearance when finished.

If all of this seems a little overwhelming, don’t worry! You’ll get the hang of it soon. Plus, several fabric stores actually have an interfacing guide next to their rack of interfacing bolts to help you choose the right one for your project.

Happy sewing!
Learni.st – Learn how to sew starting from step one
Pinterest & Twitter – Follow for tips, ideas, and more
Etsy – Shop Sew Me Your Stuff

September/October 2012 Summary

Hello sewists! It’s November, which means it’s time to put the shorts away and stay warm inside while you get started on some Christmas crafts! If you’ve fallen behind on Sew Me Your Stuff posts, here’s a recap of what’s been covered the last couple of months.

Need to go back further? Past recaps:

Sewing Patterns:

Sewing Machine Help:

Notions and other Tools:

A Bag’s Life:

Remember, if you ever would like to see a topic covered by Sew Me Your Stuff, just submit it here!

Learni.st – Learn how to sew starting from step one
Pinterest & Twitter – Follow for tips, ideas, and more
Etsy – Shop Sew Me Your Stuff

Helpful Link: Sewing Patterns are Your Friend

I came across this blog post on Pinterest and thought it was absolutely great. I have covered how to use sewing patterns in a few past posts: Choosing a sewing pattern, A Bag’s Life parts 1 2 & 3, and this video on reading patterns.

I loved this blog post though and really wanted to share it. If you’re ever in a jam, it’s a helpful guide to reading all those numbers on the back of the sewing pattern.

Click the image to read: Tales of a Trophy Wife: Sewing 101: Patterns are your Friends

Learning how to use sewing patterns is important for beginners learning to sew - Sew Me Your Stuff

Happy sewing!

Learni.st – Learn how to sew starting from step one
Pinterest & Twitter – Follow for tips, ideas, and more
Etsy – Shop Sew Me Your Stuff

How to Attach Fusible Interfacing

It’s time to take a little break from the sewing machine and talk about fusible interfacing. It is a very handy tool that is really worth your time to learn how to use properly!

I first mentioned fusible interfacing in this post about important notions and tools you’ll need to know as you expand into new crafts and projects.

Interfacing is used to stiffen fabric so that your finished project will hold a certain shape. It’s usually used in collars and buttonholes but has many applications. Interfacing can be fusible or nonfusible. Fusible interfacing can be attached to fabric using heat, but nonfusible must be stitched to the fabric.

This post will help you learn to apply fusible interfacing using your iron. Remember, you can click any of the pictures to enlarge for clarity.

Things you’ll need:

  • The piece of fabric on which you need to apply the interfacing
  • A piece of fusible interfacing cut slightly smaller than your piece of fabric, typically about 1/4 inch from the cut edge
  • Your iron on a medium/high setting
  • A pressing cloth
  • Some water, in a spray bottle if possible

Having the right equipment is important when learning how to attach fusible interfacing if you are a beginner learning to sew with sewing notions - Sew Me Your Stuff

Here I have set up everything that I need. I’m only attaching a small piece of fusible interfacing to fabric. Notice that the interfacing piece is slightly smaller than my fabric piece. When you trace a sewing pattern, generally you will trace the same size interfacing pieces as fabric pieces. However, before you attach the fusible interfacing, you’ll want to trim it to be about 1/4 inch from the edge of the fabric to avoid bulk.

Having the right equipment is important when learning how to attach fusible interfacing if you are a beginner learning to sew with sewing notions - Sew Me Your Stuff

Place your interfacing right side down on the wrong side of your fabric. In other words, place the fabric on your ironing board wrong side up. Then place your interfacing on top of the fabric right side down. The right side of the interfacing is the sticky side with raised bumps. The wrong side, which is smoother and not sticky, should be face up.

Then place your pressing cloth on top of both pieces. Your pressing cloth should be a thin piece of cotton fabric.

Attaching fusible interfacing properly is important for a beginner learning to sew with sewing notions - Sew Me Your Stuff

Next, spray the pressing cloth with water until it is damp. Dampen the entire area covering the fabric and the interfacing. If you do not have a spray bottle, you can wet your cloth in the sink, but a spray bottle will save you time. You don’t want your fabric to be soaking wet, and a spray bottle will help you aim right for the area that will be over the interfacing and fabric.

Attaching fusible interfacing properly is important for a beginner learning to sew with sewing notions - Sew Me Your Stuff

While you set up your fabric, interfacing, and pressing cloth, you should allow your iron to heat to a medium/high setting. Once your cloth is properly damp, press your iron firmly onto a section of the fabric and interfacing for 10-15 seconds.

Attaching fusible interfacing properly is important for a beginner learning to sew with sewing notions - Sew Me Your Stuff

Now there’s an iron-shaped dry spot right exactly I was pressing my iron!  If you have your cloth at optimal dampness and your iron at optimal heat, the pressing cloth should be dry when you lift your iron. Repeat this until you have pressed your iron onto every section of the fabric and interfacing.

Attaching fusible interfacing properly is important for a beginner learning to sew with sewing notions - Sew Me Your Stuff

And voila! Now the interfacing sticks directly to the fabric even as I bend it, fold it, and wave it around.

There are varying weights of interfacing to choose from based on the weight of your fabric and your desired stiffness. When you go to the fabric store, they may have a guide handy next to their interfacing bolts to help you choose the right weight for your project.

Happy sewing!

Learni.st – Learn how to sew starting from step one
Pinterest & Twitter – Follow for tips, ideas, and more
Etsy – Shop Sew Me Your Stuff

Machine Stitches to Know

Hello sewists! I hope you’re getting comfortable pushing fabric through your sewing machine and are ready to get more creative with your stitches, because now it’s time to look at the different stitches your machine can do and when to use them. There are approximately billions of different stitches you can do (estimation rounded up), but here are some of the basic stitches that will come in handy on your machine.

Straight stitch – I hope you’ve already been using this stitch by now as it is the most basic, simple stitch that a machine can do. It can hold together most basic seams and is totally sufficient for a beginner sewist working on early projects and crafts. If you choose not to finish your raw edges and seams, an entire project can be completed using only a straight stitch.

Straight stitches are also used for embellishments like topstitching. Topstitching is simply a straight stitch done on the right side of the fabric that is visible on the completed project. Usually, topstitching will be used to secure a seam allowance in a certain direction, but it can also be used purely for decoration. As covered in this post, you should use a longer stitch length for topstitching.

If your pattern calls for staystitching, this is simply a straight stitch done in the seam allowance that forces a pattern piece to hold its shape during construction. This is often used when a pattern piece cut in one direction will be attached to a piece that was cut in another direction. Use a normal stitch length if you need to staystitch a piece.

If you need to gather some fabric, simply stitch a straight stitch with a long stitch length and pull the ends to cause the fabric to bunch. For an illustration, see this post on stitch length.

Zigzag stitch – A zigzag stitch is exactly what it sounds like, a stitch that directs the thread in zigzag lines rather than straight lines. The primary purpose of a zigzag stitch when stitching a seam is to provide the fabric with more stretch than a straight stitch will allow. Remember these stitches from last week’s stitch length post?

Knowing what basic sewing machine stitches to use when is important for a beginner learning to sew - Sew Me Your Stuff

Well here is the same fabric, stitched this time with a zigzag stitch instead of a straight stitch.

Knowing what basic sewing machine stitches to use when is important for any beginner learning to sew - Sew Me Your StuffKnowing what basic sewing machine stitches to use when is important for a beginner learning to sew - Sew Me Your Stuff

Notice that the fabric not only does not pucker as it did with the straight stitch, but it is much more free to stretch.

Zigzag stitches are also used in finishing edges after stitching and pressing a seam. To achieve this, simply stitch a zigzag stitch right on the edge of a seam allowance.

Knowing what basic sewing machine stitches to use when is important for any beginner learning how to sew - Sew Me Your Stuff

Zigzag stitches are also used to sew the edges of buttonholes. If your sewing machine is equipped for buttonholes, you simply sew a zigzag stitch with an extremely short stitch length to create the buttonhole edges. Be on the lookout for a future tutorial on buttonholes!

Finally, you’ll want to use a zigzag stitch when attaching elastic directly to fabric. Using a zigzag will allow the elastic to stretch and will ensure that the entire elastic strip is attached if you adjust the width or your stitch to cover the entire band.

Knowing what basic sewing machine stitches to use is important for any beginner learning to sew - Sew Me Your Stuff

Blind hem stitch – This is actually a stitch I typically skip and do by hand, but it can come in very handy if you master it. If you look at a dress skirt or dress pants very closely, you can find a faint line of stitches on the outside of the garment where the hem has been attached. This was achieved using a blind hem stitch. The process of performing this stitch is slightly more complicated than a straight stitch or zigzag stitch, so I will have to write a full post on it in the near future.

Knowing what basic sewing machine stitches to use is important for any beginner learning to sew - Sew Me Your StuffKnowing what basic sewing machine stitches to use is important for any beginner learning to sew - Sew Me Your Stuff

Here is a picture of a blind hem stitch in progress and a completed blind hem stitch.

When I say that I do this by hand, I mean I use the stitch demonstrated in this post.

These three stitches combined are truly all you’ll need as a beginner to complete a plethora of different crafts and projects. Happy sewing!

Learni.st – Learn how to sew starting from step one
Pinterest & Twitter – Follow for tips, ideas, and more
Etsy – Shop Sew Me Your Stuff

Stitch Length & How to Use It

Now that you know what all (or at least most) of the knobs on your sewing machine do and how to get your machine started, it’s time to start looking at machine stitching itself.

To make a stitch, you place the fabric under the needle, slide down the presser foot, and hit the pedal. Easy enough! But to really get advanced with your sewing, you’ll have to learn different techniques in stitching to achieve different effects.

First, let’s talk about stitch length.

Part of this is probably intuitive: shorter stitches are more durable and tighter, while longer stitches are looser. So when do you need each?

  • As a beginner, there are pros and cons to each. A long stitch may be favorable because it uses less thread than a short stitch. Short stitches are generally more durable, but for your earlier projects you may be willing to sacrifice durability for resourcefulness. On the flip side, setting your machine to a longer stitch means that the feeder dogs will move more quickly. If you don’t yet feel comfortable using your machine at high speeds, you may want to stick with shorter stitch lengths until you have better control over your fabric as you feed it into the machine.
  • If you’re using a stretchy fabric, you’ll want to use a longer stitch. Shorter stitch lengths can pull and pucker your fabric. If you find that your stitches are puckering on a certain fabric, try adjusting the stitch length to allow for longer stitches.
    Knowing how to use different lengths of stitches is important as a beginner learning how to sew
    Notice in the above picture that the stitch on the left is significantly more puckered than the fabric on the right. The stitch on the left was done using the shortest stitch on my machine, while the stitch on the right was done using the longest stitch.
    Knowing how to use different stitch lengths is important for a beginner learning how to sew
    The fabric in this picture is a non-stretchy fabric. Notice that there is no significant difference in puckering between the short stitch length and the long stitch length.
  • For decorative stitches such as topstitching, which is visible on the finished project, a long stitch length is usually more favorable. Long stitches are generally more attractive than short stitches.
    Knowing how to use stitch length is important for a beginner learning how to sew
    In the above picture, the seam has been sewn and the seam allowance pressed to one side and then topstitched. More on this process later, but notice that the stitch is a long stitch length. For durability use short stitch lengths; for decor use long stitch lengths.
  • Another function of long stitch lengths is gathering. If a pattern calls for you to gather a seam, you stitch with a long stitch length and then pull the ends of the thread to cause the fabric to bunch.
    Knowing when and how to change your stitch length is important for a beginner learning to sew
    Pictured is the same non stretchy, long stitch length seam from the second picture. Because the long stitch length makes the seam looser, I can pull on the ends of the thread and gather the fabric.
  • So how do you change your stitch length? It depends on your machine. There are generally two types of stitch length dials: stitches per inch and millimeters.
    Knowing how and when to use different stitch lengths is important for a beginner learning to sew
    Pictured is the stitch selector and stitch length knob (top) on my machine. Mine uses a millimeter scale, as evidenced by the numbers 1, 2, 3, and 4. These numbers simply indicate how many millimeters long each stitch will be with 1 being the shortest and 4 being the longest. If your stitch length knob has numbers ranging from 4 to 60, yours is a stitches per inch machine. This is the reverse from a millimeter machine because a higher number, 60 stitches per inch, indicates a shorter stitch because there are more stitches in a single inch than, say, 4 stitches per inch. For basic everyday sewing, a stitch length of 10-12 stitches per inch is typical. On a millimeter machine, this is about a 2.5 millimeter stitch.
  • To adjust your stitch length, simply rotate the knob to select the length you need!

I hope you found this helpful! Soon I will cover basic stitches and techniques with a sewing machine.

Happy sewing!

Learni.st – Learn how to sew starting from step one
Pinterest & Twitter – Follow for tips, ideas, and more
Etsy – Shop Sew Me Your Stuff

Helpful Link: Sewing Machine Tension

The tension adjuster on your sewing machine is one of those mysterious dials that many sewists try to avoid touching. If you’re having a problem, you’ll often hear “It’s probably a problem with your tension settings” but not much else on how to actually fix the problem.

Thread tension itself isn’t a very complicated idea, but adjusting and perfecting it can be a little intimidating since you have top thread tension and bobbin thread tension which are adjusted completely separately.

While browsing Pinterest (side note: SMYS now has a Pinterest!) I came across a link to this blog post by Threads Magazine that thoroughly explains thread tension and is well worth a read.

If you feel that this is a bit advanced for you at this point, definitely hold onto it for later reading if you’re having trouble with your sewing!

Link: Understanding Thread Tension

Happy reading!

Learni.st – Learn how to sew starting from step one
Pinterest & Twitter – Follow for tips, ideas, and more
Etsy – Shop Sew Me Your Stuff

A Bag’s Life Part 2: The Pattern

In a previous post I detailed the hunt for a simple project pattern at the fabric store. Now it’s time to look at how to use the sewing pattern, first by reading and interpreting it.

When you open a new pattern, it will have two things in it: instructions, and the pattern printed on drafting paper.

Before you start trying to cut out the pattern, let’s first look at the instructions.

Learning how to use a sewing pattern to make a craft is important for beginners learning to sew - Sew Me Your Stuff

It is very important to closely read all of the sewing instructions that accompany a pattern, not just the step-by-step. They will typically define unfamiliar terms, specify the width of the seam allowance, and tell you important tips that might be omitted from the step-by-step instructions. Notice under “Layout & Cutting” in the picture (click the image to enlarge) the pattern illustrates how to lay out the pattern pieces on your fabric to trace. This pattern is pretty simple, but that is really helpful for more complex projects or projects where you have to consider the grainline.

After you have studied the instructions, it’s time to look at the pattern pieces.

Learning how to use a sewing pattern to make a craft is important for beginners learning to sew - Sew Me Your Stuff

This bag can be produced in a small, medium, or large size, so the pattern has three different lines outlining the body of the bag that you can trace depending on the size of the bag that you want. The second piece of the pattern, the pocket, comes in only one size.

If you have a pattern that gives you multiple sizing options, be extra careful when cutting to be sure that you are being consistent. Many clothing patterns are printed in 6 or 8 sizes at once, so it takes some focus to make sure that you don’t mix up the lines and start cutting out the wrong size. However, once you get more advanced you may want to intentionally blend sizes to fit your body or tastes better – until then just stick to one size at a time!

I’ve decided that I only want a small bag, so it’s time for me to start cutting.

Learning how to use a sewing pattern to make a craft is important for beginners learning to sew - Sew Me Your Stuff

Notice that my scissors are cutting along the “small” dotted line. Alternatively, I could have cut along one of the bigger lines and simply maneuvered to trace the “small” line, but I decided to keep it simple.

And here are my cut out pieces!

Learning how to use a sewing pattern to make a craft is important for beginners learning to sew - Sew Me Your Stuff

In the next post, I’ll show how these two pieces of paper turn into a cute tote bag!

Learni.st – Learn how to sew starting from step one
Pinterest & Twitter – Follow for tips, ideas, and more
Etsy – Shop Sew Me Your Stuff

Fabric for Beginners Part Five: Types of Synthetic Fabrics

Hello sewists!

I hope your head isn’t spinning too badly from the three posts about common and useful cotton fabrics (one, two, three), because it’s time to talk about more fabrics! Today I’ll focus on synthetic fabrics which are often an inexpensive alternative to natural fabrics.

You probably are pretty familiar with polyester, but there are a wide variety of synthetic fabrics available that mimic or enhance natural textiles. Some are used for very specific purposes while others can be adapted to different garments and crafts and blended with other textiles to create a unique fabric. Here is a basic guide to some of the most common synthetic fabrics you’re likely to encounter.

  • Acetate
    Acetate is commonly used in garment lining, which is a handy thing to know when you're learning to sew - Sew Me Your StuffAcetate is commonly used in garment lining, which is a handy thing to know when you're learning to sew - Sew Me Your Stuff
    Acetate is a fabric made from cellulose with a silky and lustrous appearance. In clothing it is most often found as the lining for garments like dresses, skirts, and other formal or professional wear. Garments containing acetate usually have to be dry cleaned, so as a beginner you may want to stick to lining materials that can be washed in the machine.
  • Acrylic
    Acrylic fabric has some good properties, but natural fibers are probably a better option for someone learning to sew. - Sew Me Your Stuff
    Acrylic fabric is often used to imitate wool or cashmere or in babies’ clothing because it can be cleaned repeatedly without wearing as much as most fabrics. It’s more often used in knitting than in sewing and in home decor. I have never used acrylic since I started sewing, and I feel like a beginner probably will have little use for it and would be better off sticking to natural textiles.
  • Nylon
    Nylon Fabric is a very common synthetic fabric but may not be the best choice for someone learning to sew - Sew Me Your Stuff
    Nylon is one of the oldest truly synthetic fabrics, and it has a million uses. It can be found in home decor, outerwear, athletic wear, swimwear, and even bridal gowns because of its versatility. It’s highly durable and resistant to environmental damage, so it’s often used in outdoor gear. Some say that nylon is a good choice for beginners because it’s inexpensive and versatile, but lots of extra care has to be taken to sew nylon successfully. It can’t be pressed or pinned which are techniques that beginners need to learn, so I would recommend saving nylon for later!
  • Polyester
    Polyester is a really common synthetic fabric that can be very useful for beginners learning to sew - Sew Me Your StuffPolyester is a very common synthetic fabric that can be useful for beginners learning to sew - Sew Me Your Stuff
    I’ve known some girls who have tried to cut polyester from their wardrobes completely, but I’m not sure that’s possible anymore. Polyester can be found in a wide array of garments and mixed with other fibers to create many different fabrics. I think most people associate polyester with imitation silk and don’t realize how versatile it actually is (Side note: If you’re not sure if a garment is polyester or silk, set it on fire. If it burns, it’s silk; if it melts, it’s polyester. Learned that one in China!). As a beginner, polyester can be a good choice because it’s so inexpensive, but I would still recommend avoiding very stretchy knits because those are difficult for beginners. Make sure you use small needles and polyester threads – cotton thread won’t have enough stretch!
  • Rayon
    Rayon is a comfortable and inexpensive synthetic fiber but can be difficult for beginners learning to sew - Sew Me Your Stuff
    Rayon was first introduced as imitation silk, but has since become pretty well known in its own right because it drapes so well and can be used in a wide variety of garments. Rayon is very lightweight and silky which makes for great garments but can cause a lot of headaches for beginners. Beginners using rayon have difficulty cutting the fabric because it slides so much and often need to use interfacing to be able to stitch the  fabric and keep it stable. Maybe after you get more experience sewing stretchy cotton or polyester knits, rayon will be a good choice for making some beautiful garments.

That’s just a quick summary of the most common synthetic fabrics you’ll encounter at your fabric store. The one I would most recommend for beginners is polyester because it’s so inexpensive and versatile. Remember to prewash and preshrink your fabrics, no matter what you’re using!

Happy sewing!

Learni.st – Learn how to sew starting from step one
Pinterest & Twitter – Follow for tips, ideas, and more
Etsy – Shop Sew Me Your Stuff