Notions to Know: How to Sew a Buttonhole

In this post, I covered how to sew on a button by hand. But we all know a button is not very useful without a hole for it! So how do you sew a buttonhole?

Many sewing machines come equipped with a buttonhole stitch and foot. If your machine has this function, sewing a buttonhole is as easy as a little set up and pushing the pedal according to your machine’s instructions. If not, there’s still hope for you!

This post will teach you how to sew a buttonhole using a simple zigzag stitch.

First, mark your fabric where the buttonhole will go. The length of the hole should be just slightly longer than the width of the button. I’m using a 5/8″ button, so my hole will be just longer than 5/8″. When you do this on a real craft, you’ll want to use something easily washable like tailor’s chalk, because buttonholes usually show on the finished product. For this demonstration I’m just using a fabric marker.

Working with sewing notions is important for a beginner learning how to sew a buttonhole - Sew Me Your Stuff

Next, set up your fabric in your machine with the regular presser foot. It’s wise to use interfacing before you sew a buttonhole to stabilize the fabric, but for this demonstration I’m just using two layers of cotton fabric. Start with the top of the hole below the needle.

Working with sewing notions is important for a beginner learning how to sew a buttonhole - Sew Me Your Stuff

Set your machine to a wide zigzag stitch, with a stitch length of 0. Sew a few stitches and then stop.

Working with sewing notions is important for a beginner learning how to sew a buttonhole - Sew Me Your Stuff

Adjust your fabric so that the needle is just to the right of the mark. Set your machine to a narrower zigzag stitch with a short stitch length (but longer than 0) and sew the length of the mark.

Working with sewing notions is important for a beginner learning how to sew a buttonhole - Sew Me Your Stuff

When you reach the bottom, repeat the wide zigzag stitch used at the top.

Working with sewing notions is important for a beginner learning how to sew a buttonhole - Sew Me Your StuffWorking with sewing notions is important for a beginner learning how to sew a buttonhole - Sew Me Your Stuff

Now position your fabric so that the needle is to the left of the mark. Stitch in reverse with a narrow zigzag stitch and a short stitch length.

Working with sewing notions is important for a beginner learning how to sew a buttonhole - Sew Me Your Stuff

Now cut your thread and pull the fabric out of the machine. Using a seam ripper and/or small scissors, cut the fabric on the mark. Be careful not to cut the stitches!

Working with sewing notions is important for a beginner learning how to sew a buttonhole - Sew Me Your StuffWorking with sewing notions is important for a beginner learning how to sew a buttonhole - Sew Me Your Stuff

Now your buttonhole is ready to go!

Working with sewing notions is important for a beginner learning how to sew a buttonhole - Sew Me Your Stuff

Happy sewing!

Learni.st – Learn how to sew starting from step one
Pinterest & Twitter – Follow for tips, ideas, and more
Etsy – Shop Sew Me Your Stuff

Notions to Know: How to Sew on a Button by Hand

Buttons are an extremely common item that we’ve all encountered. And if you’re like me when I started sewing, you probably have a basic understanding of how a button is attached to fabric but aren’t sure exactly how to sew on a button for yourself. It is a very handy skill to learn, however, and can open you up to a wide variety of crafts and projects to complete.

Here is a guide on how to sew on a button, and hopefully you find it helpful!

First, you’ll need a button, fabric, and corresponding thread. For this example I’m using a sharply contrasting thread, but typically you’ll want one that matches your fabric and/or button.

Learning how to sew on a button is important for any beginner learning how to sew - Sew Me Your Stuff

We’ll start on the underside of the fabric, the opposite side from where the button will be. Starting from this side, stitch a small “X” on the front of the fabric to mark where the button will be. Your loose end of thread will be on the underside, but this “X” will be on the outside. If your button slides around during stitching, use this “X” to keep it in the right spot.

Learning how to sew on a button is important for any beginner learning how to sew - Sew Me Your Stuff

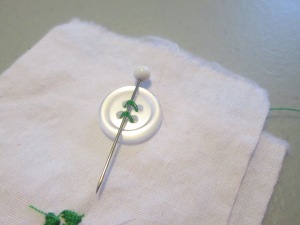
Place your button right on top of this “X” then place a pin, needle, toothpick, or similarly-shaped object on top of the button. This will keep you from sewing the button too tightly, which will be important later. This object is called the spacer.

Learning how to sew on a button is important for any beginner learning how to sew - Sew Me Your Stuff

Next, starting from the underside of the fabric, push your needle up through one of the holes of the button and down through another hole across your spacer.

Learning how to sew on a button is important for any beginner learning how to sew - Sew Me Your Stuff

Repeat this for the second set of holes if you’re using a 4-hole button like I am.

Learning how to sew on a button is important for any beginner learning how to sew - Sew Me Your Stuff

Now repeat the process multiple times for each set of holes. You can get creative and criss-cross holes if you’d like, but for simplicity’s sake I’m just going straight across. Three times per set of holes (6 total) should be sufficient.

Learning how to sew on a button is important for any beginner learning how to sew - Sew Me Your Stuff

Finally, from the underside of the fabric, push the needle up through the fabric but not through a hole. The thread should come out from under the button.

Learning how to sew on a button is important for any beginner learning how to sew - Sew Me Your Stuff

Now remove your spacer and lift your button away from the fabric. Thanks to your spacer, there will be some slack.

Learning how to sew on a button is important for any beginner learning how to sew - Sew Me Your Stuff

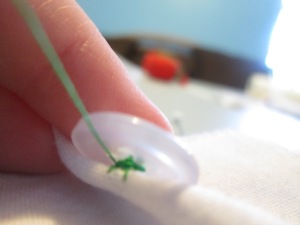
Now circle your thread around the slack below the button to form the shank. The shank gives the button some height so that it can sit on top of the fabric when pushed through the buttonhole. The thicker your fabric, the more times you should wrap the thread. For most fabrics, 6 times is enough.

Learning how to sew on a button is important for any beginner learning how to sew - Sew Me Your Stuff

Now push your needle down through the fabric to tie off the thread. I do this by first pushing the needle through the stitches but don’t pull it all the way through to form a loop in the thread and use that to make the knot. Then take the loose end from the beginning of the process and tie a square knot.

Learning how to sew on a button is important for any beginner learning how to sew - Sew Me Your Stuff

Trim your ends and you’re done! Your button is ready for action.

Learning how to sew on a button is important for any beginner learning how to sew - Sew Me Your StuffLearning how to sew on a button is important for any beginner learning how to sew - Sew Me Your Stuff

Happy sewing!

Learni.st – Learn how to sew starting from step one
Pinterest & Twitter – Follow for tips, ideas, and more
Etsy – Shop Sew Me Your Stuff

Notions to Know

There are a lot of crafts and garments that can be made with just some properly cut fabric and stitches, but to expand your repertoire you’re going to need to learn about notions. Notions are basically any non-fabric part of a garment or tool used to create a certain effect.

In this post and this post about buying your beginning sewing supplies, as well as in this video, you’ll find a lot of basic tools and notions that will help you construct a basic craft or garment. Now that you’ve moved onto sewing patterns and are getting a little more advanced, you’ll encounter patterns that call for specific notions to create specific effects. Here are a few that I ran into a lot as a beginner that left me confused or intimidated.

  • Buttons
    Buttons are a basic but important sewing notion for beginners who are learning to sew - Sew Me Your Stuff
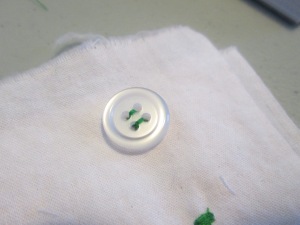
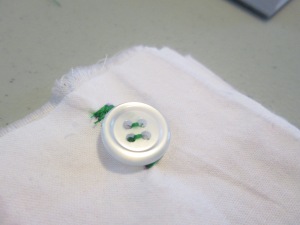
    We all know buttons. But actually attaching them to a garment takes a bit of effort – you might want to look for a sewing machine with a buttonhole stitch to make these easier. Some machines even have a stitch to sew on buttons, but personally I usually sew notions like this by hand to gain more precision. There will definitely be a post or two in the future about sewing buttons!
  • Zippers
    Zippers are important basic sewing notions for beginners learning to sew. - Sew Me Your StuffZippers are important basic sewing notions for beginners learning to sew. - Sew Me Your Stuff
    Zippers are a bit of a challenge to learn – even my mother never bothered to sew things with zippers because she never got the hang of it. Really encouraging for me to hear when she was helping me learn to sew. But with some practice and careful reading of the instructions, you can pick it up in no time. Invisible zippers are handy to learn, but sometimes you just need a basic zipper.  Once you learn the process of attaching a zipper, you’ll be opened up to a whole new world of crafts you can make!
  • Elastic
    Elastic is an important basic sewing notion for beginners learning to sew. - Sew Me Your Stuff
    Elastic is generally used to fit a garment or create an effect and can be attached in different ways. You can sew a casing, push the elastic through, and sew it shut. Also you can sew the elastic directly to the fabric, which I find more challenging because sewing on a stretch is never easy for beginners. However, casings are pretty easy and can give beginners a lot of opportunities to get creative with projects!
  • Interfacing
    Interfacing is an important sewing notion for beginners learning to sew to learn. - Sew Me Your Stuff
    Okay, this may not count as a “notion,” technically. If your pattern calls for interfacing, it’s usually listed under the fabric requirements. It’s bought by the yard just as fabric as well. Most patterns I’ve seen will call for fusible interfacing, which is attached to fabric using an iron. Non-fusible interfacing is sewn on. Interfacing is used to stiffen fabric and keep it from warping, such as collars or buttonholes. Once you use it a couple of times it’s no sweat at all!
  • Bias tape
    Bias tape is a sewing notion with a lot of great uses for a beginner learning to sew  - Sew Me Your Stuff
    Bias tape has many wonderful and handy uses, but full disclosure I haven’t really used it for any of them. You can finish raw edges with it, add accents, bind seams, and a lot more. It’s fabric that’s been cut on the bias of fabric so it won’t unravel and has much more flexibility than fabric that follows the grainline. Basically there are a million things you can use bias tape for, and I’m going to make a million tutorials to help you learn them!

Happy sewing!

Learni.st – Learn how to sew starting from step one
Pinterest & Twitter – Follow for tips, ideas, and more
Etsy – Shop Sew Me Your Stuff